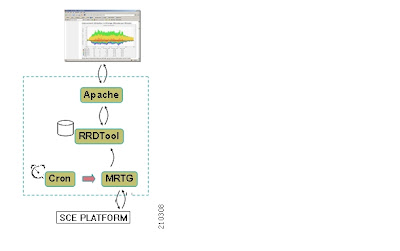
Monday, August 31, 2009

How to install SCABB snmp real time monitoring (SNMP RTM)

If you had installed SCABB (Service Control Aplication Broadband) or if you had read scabb end user guide you will be familiar with this topic. This is a tool for network admins to monitor their network using SNMP in real time. Refer to the cisco guide, the snmp tool that we will be used are MRTG (Multi Router Traffic Grapher) and RRD (Round Robin Database) tool. MRTG will collect snmp data from sce then generate html pages, rrd tool will store data using round robin database and then generate a graph. In my Lab environment I'm using my desktop with windowsxp, scabb v3.1.6 , sce 2020.

How it works :

These are the components that will be used to install SNMP RTM:
1. MRTG-2.1.5 - download from mrtg.org

2. rrdtool-1.2.15 - download from rrdtool.org

3. Active Perl 5.8 - search google.com and download

4. Apache2 - download from apache.org

5. sca_bb v3.1.6 - download from cisco.com
6. sca_bb utility - extracted from sca_bb v3.1.6

7. scabb_rtm_templates_v3.0.5A_b05 - download
from cisco.com
8. firedaemon - search google.com and download

9. Java (jre) 1.4.2 - download from java.sun.com


- mrtg for collecting snmp
- rrd tool to store data

- Active perl for running mrtg

- Apache for running web server, cgi

- scabb v3.1.6 to get scabb utility

- scabb utility for generate mrtg cfg files

- scabb rtm template for generate
cfg file refer to the template and sce configuration
- firedaemon for running scheduler
- java needs for running scabb utility


Getting started :

1. Install mrtg, perl, rrdtool in C:\

2. Install apache web-server C:\Program Files

3. Install firedaemon
4. Install java

5. Extract scabb v3.1.6, extract scabb util (bin & lib) to C:\
6. Extract scabb rtm template to C:\bin\

7. Create directory rtm-output in C:\bin\

8. Edit rtcmd.cfg file


#The absolute path to the RRD tool's execution files folder
#Use '\\' or '/' as path separator
rrdtool_bin_dir=C:/rrdtool-1.2.15/rrdtool/Release

#The absolute path where RTM files will be placed.
#This path will be used by MRTG to create and update the RRD files
#Note: path must not contain white spaces!
rtm_dir=C:/PROGRA~1/APACHE~1/Apache2.2/htdocs

#The absolute path to the MRTG bin folder.
#This path will be used to create file crontab.txt
mrtg_bin_dir=C:/mrtg-2.14.5/bin

#The SCE's community string
snmpCommunityString=public
rrdtool_bin_dir=C:/rrdtool-1.2.15/rrdtool/Release

9. Open command prompt, running this command "rtmcmd -S "ip_sce1;ipsce2" -U xxxxx -P xxxxx --pqb-sce=ip_sce1 --source-dir=/templates --dest-dir=/rtm-output -c ./rtmcmd.cfg

C:\bin\rtmcmd -S "ip_sce1;ipsce2" -U xxxxx -P xxxxx --pqb-sce=ip_sce1 --source-dir=/templates --dest-dir=/rtm-output -c ./rtmcmd.cfg
connecting to ip_sce1 ... done
retrieving service configuration from SCE ... done
disconnecting from device ... done
loading user configuration from file 'rtmcmd.cfg' ... done
processing templates from '\templates' to '\rtm-output' ... done
C:\bin>

10. Check rtm-output directory

C:\bin\rtm-output>dir
Volume in drive C has no label.
Volume Serial Number is C4C2-8BAA

Directory of C:\bin\rtm-output

08/31/2009 08:16 AM dir .
08/31/2009 08:16 AM dir ..
08/31/2009 10:30 AM 43 .htaccess
08/31/2009 10:30 AM 386 crontab-unix.txt
08/31/2009 10:30 AM 310 crontab-windows.txt
08/31/2009 08:16 AM dir mrtg-cfg
08/31/2009 08:16 AM dir sce_202.155.50.75
08/31/2009 08:16 AM dir sce_202.155.50.77
08/31/2009 08:16 AM dir static

11. Copy all file to C:\Program Files\Apache Software Foundation\Apache2.2\htdocs>
12. Edit httpd Apache configuration file and add this text :


Options Indexes FollowSymLinks ExecCGI
AllowOverride Indexes
Order allow,deny
Allow from all


13. Test mrtg and mrtg cfg file with this command :


C:\Perl\bin>perl.exe c:\mrtg-2.14.5\bin\mrtg "c:\Program Files\Apache Software Foundation\Apache2.2\htdocs\mrtg-cfg\ip_sce1_scabb_mrtg.cfg"


C:\Perl\bin>perl.exe c:\mrtg-2.14.5\bin\mrtg "c:\Program Files\Apache Software Foundation\Apache2.2\htdocs\mrtg-cfg\ip_sce1_scabb_mrtg.cfg"

If no error appear, you can check working directory a lot of rrd files has been generated.

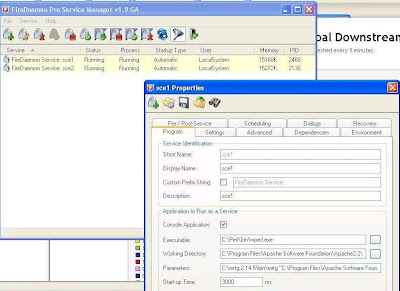
14. Open firedaemon, add new service definition :

Shortname : sce1
Executable : C:\Perl\bin\wperl.exe
Working Dir :C:\Program Files\Apache Software Foundation\Apache2.2\htdocs\sce_ip_sce1
Parameters : C:\mrtg-2.14.5\bin\mrtg "C:\Program Files\Apache Software Foundation\Apache2.2\htdocs\mrtg-cfg\ip_sce1_scabb_mrtg.cfg"


Start Service sce1

Shortname : sce2
Executable : C:\Perl\bin\wperl.exe
Working Dir :C:\Program Files\Apache Software Foundation\Apache2.2\htdocs\sce_ip_sce2
Parameters : C:\mrtg-2.14.5\bin\mrtg "C:\Program Files\Apache Software Foundation\Apache2.2\htdocs\mrtg-cfg\ip_sce2_scabb_mrtg.cfg"

Start service sce2


15. Open web browser and type :

http://localhost/sce_ip_sce1/
http://localhost/sce_ip_sce2/

And finally you will see the following display in your browser :

Refference http://www.cisco.com/en/US/products/ps61/products_user_guide_book09186a0080843872.html

Friday, August 14, 2009

Update protocol pack and signature using SCABB / SCE

Using Cisco SCE we can manage traffic per application based on protocol that supported by SCE Software. In my lab I use sce 2020, Software 3.1.6. My goal is I want to control or even block the subscribers traffic in accessing bandwidth consuming application such as peer to peer, flash youtube, flash yahoo, video google, http download etc.

First I applied the streaming service to the package and made some rule to control it, then I mapped the subscriber using SM to use that package. Somehow the rule was not working, user could still have an access to the video google, flash youtube etc. Than I checked the reporting in SCABB the user traffic is classified as a browsing. I was thinking that SCE cannot detect those protocol as a flash protocol that is define in its service configuration protocol. I checked at the cisco website than I found that I must upgrade the protocol pack of the existing software. This happen because of there are some of a new update to the protocol in internet, SCE must improve the capabilities in detecting and making classification to the new protocol and signature. The new update of protocol pack now is SCA BB Protocol Pack #17, it resolved some of caveat in the previous protocol pack, such as miss classifying protocol i.e yahoo login, flash etc.

This is the new update protocol :
• Flash YouTube HD
• Flash YouTube Normal

• Yahoo General Login

• Sky Player - (Supported by 3.5.0 only)


and here is the guide :

1. Download SPQI at cisco.com
2. Extract the SPQI file 3.1.6 Protocol Pack #17 ZIP package

3. install the ProtocolPack using SCABB, right clik on sce, network navig
ator menu


4. Extract the script.txt file from the 3.1.6 Protocol Pack #17 ZIP package and upload to the SCE platform using FTP.


SCE2020#copy-passive ftp://user:pass@ip-address/script.txt script.txt

5. Open a CLI session in the SCE platform and navigate to the directory where the uploaded script.txt. Using admin user run the script run script.txt.

SCE2020-2#>script run script.txt


configure
interface LineCard 0

lookup GT_LUT_HTTP_BASED_PROTOCOLS_UserAgents overwrite-key "Babelgum" value 23
lookup GT_LUT_HTTP_BASED_PROTOCOLS_UserAgents overwrite-key "babelgum" value 23
lookup GT_LUT_HTTP_BASED_PROTOCOLS_UserAgents overwrite-key "Deluge*" value 9
lookup GT_LUT_HTTP_BASED_PROTOCOLS_UserAgents overwrite-key "TVUPlayer*" value 24
lookup GT_LUT_HTTP_BASED_PROTOCOLS_UserAgents overwrite-key "PIPIPlayer" value 25
lookup GT_LUT_HTTP_BASED_PROTOCOLS_UserAgents overwrite-key "NateOn*" value 26
lookup GT_LUT_HTTP_BASED_PROTOCOLS_UserAgents overwrite-key "ed2k" value 6

lookup GT_LUT_HTTP_BASED_PROTOCOLS_HOST overwrite-key "*:*.babelgum.com" value 7
lookup GT_LUT_HTTP_BASED_PROTOCOLS_HOST overwrite-key "*:*.vuze.com" value 8
lookup GT_LUT_HTTP_BASED_PROTOCOLS_HOST overwrite-key "*:channel2.tvunetworks.com" value 10
lookup GT_LUT_HTTP_BASED_PROTOCOLS_HOST overwrite-key "co*:*.tvunetworks.com" value 10
lookup GT_LUT_HTTP_BASED_PROTOCOLS_HOST overwrite-key "*:mb.tvunetworks.com" value 10
lookup GT_LUT_HTTP_BASED_PROTOCOLS_HOST overwrite-key "*:pages.tvunetworks.com" value 10
lookup GT_LUT_HTTP_BASED_PROTOCOLS_HOST overwrite-key "*:*mail.google.com" value 11
lookup GT_LUT_HTTP_BASED_PROTOCOLS_HOST overwrite-key "*:*skype.com" value 12
lookup GT_LUT_HTTP_BASED_PROTOCOLS_HOST overwrite-key "*:*joost.com" value 13
lookup GT_LUT_HTTP_BASED_PROTOCOLS_HOST overwrite-key "*:*googlevideo.com" value 1

lookup GT_LUT_HTTP_BASED_PROTOCOLS_URL overwrite-key /videoplayback*:* value 2
lookup GT_LUT_HTTP_BASED_PROTOCOLS_URL overwrite-key *:*.hash value 7

lookup GT_LUT_DestPortBasedProtocolsPostMultipleSig overwrite-key "0.6.0.22:0xffffffff" value 16777216

lookup GT_LUT_HTTP_SPLIT_INITIATEE_BASED_PROTOCOLS_Server overwrite-key "AIM*:*" value 7

tunable GT_PL_USE_OLD_BEHAVIORAL_DOWNLOAD value false
tunable PL_AGING_RTMP value 3000
tunable GT_PL_SKYPE_TCP_PRECEDE_PKTS_PAT_MAX value 180

tunable GT_PL_BEHAVIORAL_DOWNLOAD_MIN_AVG_PACKET_SIZE value 700
tunable GT_PL_BEHAVIORAL_DOWNLOAD_MAX_VOLUME_RATIO value 25
tunable GT_PL_BEHAVIORAL_DOWNLOAD_PACKET_DEVIATION_HI_VOL_FACTOR value 50

tunable GT_PL_WINNYP_NUMBER_OF_CHECKED_PACKETS value 5
tunable GT_PL_WINNYP_MAXIMAL_ALLOWED_DIRECTION_CHANGES value 5

tunable GT_QQMaxPacketsInSameDir value 7

exit
exit

copy running-config-application startup-config-application
Writing general configuration file to temporary location...
Removing old application configuration file...
Renaming temporary application configuration file with the final file's name...

SCE2020-1#>
The screenshoot result for successfully blocked youtube and google video.

youtube :


Google Video :


This is only the sample if you want to block google video or youtube, you can control any of protocol as long as is supported by protocol pack.

Tuesday, August 4, 2009

ISG - SCE Integration using SCMP

ISG (Intelligent service Gateway) is a broadband agregation router to deliver service from service provider to the broadband subscriber. Using ISG we can control and implement dynamic policy to the subscriber such as turbo button (upgrade or downgrade speed), Parental control, Subscriber self-control using Captive Portal / Redirect Wallgarden Service and External-policy controll using CoA. For more advanced implementation is to implement ISG colaborative with SCE as a DPI (deep packet inspection) service control. Using SCE we can make some of different service levels for subscriber. We can control the subscriber trafic in the aplication layer (layer7) or we can use taffic shaping capabilites.

To integrate SCE and ISG we can use SCMP, it allows that isg and SCE to manage subscriber session and apply subscriber to particular service / profile dynamically intsead of using subscriber manager (SM) using SCABB application. External Portal / Walled garden can send a Coa packet (CoA RFC 3576) to ISG to change the user's service. In the isg policy we can define any package that will be sent using Coa to SCE include the GUID / user identity, next when the SCE accept the CoA, it will assign the package to this GUID.

I try to make a lab to implement this integration, using isg and sce 2020. Here is the diagram:

DIAGRAM :
---------------------------------------------
--------------------------------------------------------------------


-----------------------------------------------------------------------------------------------------------------

ISG configuration :

ISGD2#
!
aaa attribute list coa
attribute type nas-ip-address 172.16.0.29
!
!
!
aaa server radius policy-device
key peditea
message-authenticator ignore
client 192.168.50.77 vrf vpn_internet key peditea
!


Verify the SCMP peer in the ISG:

ISGD2#sh subscriber policy peer all
EXTERNAL POLICY PEER Details:
=============================

Peer IP: 192.168.50.77
Conn ID: 11
Mode : PUSH
State : ACTIVE
Version: 2.0
Conn up time: 00:08:55
Conf keepalive: 100
Negotiated keepalive: 100
Time since last keepalive: 00:00:34
Inform owner on pull: TRUE
Total number of associated sessions: 1


CoA from ISG to SCE :

*Aug 4 06:16:27.582: RADIUS(00000000): Send CoA Request to 192.168.50.77:3799 id 1645/53, len 211
*Aug 4 06:16:27.582: RADIUS: authenticator C7 E2 B1 A2 F5 7B 13 65 - 98 05 83 9B A5 DF 5E CE
*Aug 4 06:16:27.582: RADIUS: Vendor, Cisco [26] 37
*Aug 4 06:16:27.582: RADIUS: Cisco AVpair [1] 31 "session-guid=CA9B591E0000003C"
*Aug 4 06:16:27.582: RADIUS: NAS-Port [5] 6 60000
*Aug 4 06:16:27.582: RADIUS: NAS-Port-Id [87] 21 "nas-port:0/0/0/86/0"
*Aug 4 06:16:27.582: RADIUS: Vendor, Cisco [26] 37
*Aug 4 06:16:27.582: RADIUS: Cisco AVpair [1] 31 "subscriber:command=updateSess"
*Aug 4 06:16:27.582: RADIUS: Vendor, Cisco [26] 32
*Aug 4 06:16:27.582: RADIUS: Cisco AVpair [1] 26 "subscriber:policy-name=6"
*Aug 4 06:16:27.582: RADIUS: Vendor, Cisco [26] 36
*Aug 4 06:16:27.582: RADIUS: Cisco AVpair [1] 30 "subscriber:service-monitor=1"
*Aug 4 06:16:27.582: RADIUS: NAS-IP-Address [4] 6 172.16.0.29
*Aug 4 06:16:27.582: RADIUS: User-Name [1] 10 "fadlytea"
*Aug 4 06:16:27.582: RADIUS: Framed-IP-Address [8] 6 172.16.94.2
*Aug 4 06:16:27.586: RADIUS: Received from id 1645/53 192.168.50.77:3799, CoA Ack Response, len 63
*Aug 4 06:16:27.586: RADIUS: authenticator B8 00 27 53 E2 DF 79 28 - 82 30 38 3F 76 A9 85 06
*Aug 4 06:16:27.586: RADIUS: NAS-IP-Address [4] 6 192.168.50.77
*Aug 4 06:16:27.586: RADIUS: Vendor, Cisco [26] 37
*Aug 4 06:16:27.586: RADIUS: Cisco AVpair [1] 31 "session-guid=CA9B591E0000003C"

Verify the user session GUID:

ISGD2#sh subscriber policy peer all detail
EXTERNAL POLICY PEER Details:
=============================

Peer IP: 192.168.50.77
Conn ID: 11
Mode : PUSH
State : ACTIVE
Version: 2.0
Conn up time: 00:08:57
Conf keepalive: 100
Negotiated keepalive: 100
Time since last keepalive: 00:00:36
Inform owner on pull: TRUE
Total number of associated sessions: 1
Associated session details:
CA9B591E0000003C

ISGD2#


Verify SCMP peer in the SCE :


SCE2020-2#sh scmp all
SCMP Connection 'isg-dev2' status:
172.16.0.29 auth-port 1645 acct-port 1646
Connection state: Connected
Peer protocol-version: 2.0
Keep-alive interval: 100 seconds
Force single SCE: Yes
Send session start: Yes
Time connected: 9 minutes, 18 seconds


Verify subscriber session GUID mapping package in SCE :

SCE2020-2#SH interface LineCard 0 subscriber name CA9B591E0000003C
Subscriber 'CA9B591E0000003C' manager: isg-dev2
Subscriber 'CA9B591E0000003C' properties:
downVlinkId=0
monitor=1
new_classification_policy=0
packageId=6
QpLimit[0..17]=0*17,8
QpSet[0..17]=0*17,1
upVlinkId=0
Subscriber 'CA9B591E0000003C' read-only properties:
concurrentAttacksNumber=0
PV_QP_QuotaSetCounter[0..17]=0*18
PV_QP_QuotaUsageCounter[0..17]=0*18
PV_REP_nonReportedSessionsInTUR=0
P_aggPeriodType=5
P_blockReportCounter=0
P_endOfAggPeriodTimestamp=0
P_firstTimeParty=TRUE
P_localEndOfAggPeriodTimestamp=0
P_MibSubCounters16[0..31][0..1]=0*64
P_MibSubCounters32[0..31][0..1]=0*64
P_newParty=TRUE
p_numOfRedirections=0
P_partyCurrentDownVLink=0
P_partyCurrentPackage=6
P_partyCurrentUpVLink=0
P_partyGoOnlineTime=0
P_partyMonth=0
P_serviceReportedBitMap=0
Subscriber 'CA9B591E0000003C' mappings:
IP 172.16.94.2 - Expiration (sec): Unlimited
Subscriber 'CA9B591E0000003C' has 0 active sessions.
Aging disabled
SCE2020-2#


Thursday, July 30, 2009

PPPOE and L2TP Multihop VPDN

There are many different technology in broadband access network, include DSL, cable , ethernet, wireless etc. PPPoe is commonly used by ADSL technology in ISP. L2tp is one of the most used protocol in broadband network, it is commonly used by operators or broadband access provider to extend their network to ISP as a wholesale.

I tried to make basic concept and configuration about how to implement them. For PC, i'm using windowsXP as a pppoe client, cisco 2600 as lac (vpn-server), 7200 as lns (isg-dev2), 7200 as lns-2 (isg2-jtpd) for terminating ppp session from pc


pc will connect with pppoe using a user with domain @imm.com, vpn-server will accept pppoe request and forward and L2TP based on domain to lns (ISG-DEV2). lns than forward the ppp using l2tp multihop to lns-2 based on multihop lac hostname. lns-2 then will terminate the ppp and give the user ip adress.


DIAGRAM :


CONFIGURATION :

1. pppoe :

VPN-SERVER#

!
vpdn-group pppoe
accept-dialin
protocol pppoe
virtual-template 15
lcp renegotiation always
!


2. VPDN Tunnel Switching :

VPN-SERVER#
!
vpdn search-order domain
!
vpdn-group 1
request-dialin
protocol l2tp
domain imm.com
initiate-to ip 11.0.0.1
local name lac
no source vpdn-template
l2tp tunnel password peditea
!

ISGDEV2#

vpdn-group multihop-in
accept-dialin
protocol l2tp
virtual-template 1
terminate-from hostname lac
local name lns-multi
l2tp tunnel password 0 peditea

3. VPDN MULTIHOP (L2TP)

ISGDEV2#
!
vpdn multihop
vpdn search-order multihop-hostname
!
vpdn-group multihop
request-dialin
protocol l2tp
multihop hostname lac
initiate-to ip 192.168.89.6
local name lns-multi
l2tp tunnel password 0 peditea
!

ISG-JTPD#
!
vpdn-group 1
accept-dialin
protocol l2tp
virtual-template 1
terminate-from hostname lns-multi
local name lns-server
l2tp tunnel password 0 peditea
!

VERIFYING :


VPN_SERVER#sh vpdn

L2TP Tunnel and Session Information Total tunnels 1 sessions 1

LocID RemID Remote Name State Remote Address Port Sessions VPDN Group
3402 65399 lns-multi est 11.0.0.1 1701 1 1

LocID RemID TunID Intf Username State Last Chg Uniq ID
964 33172 3402 SSS Circuit -imm@imm.com est 00:00:14 344


ISGDEV2#sh vpdn tunnel

L2TP Tunnel Information Total tunnels 2 sessions 2

LocTunID RemTunID Remote Name State Remote Address Sessn L2TP Class/
Count VPDN Group
30787 61466 lns-server est 192.168.89.6 1 multihop
65399 3402 lac est 11.0.0.2 1 multihop-in


ISG2-JTPD#sh vpdn


L2TP Tunnel and Session Information Total tunnels 1 sessions 1

LocID RemID Remote Name State Remote Address Port Sessions L2TP Class/
VPDN Group
61466 30787 lns-multi est 192.168.89.3 1701 1 1

LocID RemID TunID Username, Intf/ State Last Chg Uniq ID
Vcid, Circuit
8 10696 61466 -imm@imm.com, Vi3 est 00:01:03 491


Reference : http://www.cisco.com/en/US/docs/ios/bbdsl/configuration/guide/bba_understanding_ps6350_TSD_Products_Configuration_Guide_Chapter.html#wp1049344

Wednesday, July 29, 2009

Point-to-Point Protocol over Ethernet - using windows & cisco

PPPOE is a network protocol for encapsulation ppp in ethernet network. It is one of dial technology beside pptp and L2TP. It is usually used in adsl network, subcriber can access internet provider using user's credential (username and password) . PPPOE works in layer 2 network meanwhile PPTP work in Layer 3.

What I want to show you is the
basic configuration using windows as a pppoe client and cisco 2600 as a pppoe server.

Here is the diagram :

-----------------------------------------------------------------------------------------------------------------


-----------------------------------------------------------------------------------------------------------------

1. Create Virtual-Template :

VPN_SERVER(config)# interface Virtual-Template1
VPN_SERVER(config-if)# ip unnumbered FastEthernet0/1.81
VPN_SERVER(config-if)# ip tcp adjust-mss 1460

2. Enable vpdn and making vpdn-group :


VPN_SERVER(config)# vpdn enable
VPN_SERVER(config)# vpdn-group pppoe
VPN_SERVER(config-vpdn)# accept-dialin
VPN_SERVER(config-vpdn-acc-in)# protocol pppoe
VPN_SERVER(config-vpdn-acc-in)# virtual-template 1
VPN_SERVER(config-vpdn-acc-in)# exit
VPN_SERVER(config-vpdn)# lcp renegotiation always

3. Configure authentication & ip address pool :

Enable AAA and method-list :

VPN_SERVER(config
)# aaa new-model
VPN_SERVER(config)# aaa authentication ppp default local
VPN_SERVER(config)# aaa authorization network default local

Create Username :

VPN_SERVER(config)# username fadly password 0 cisco

Create Ip pool :

VPN_SERVER(config)# ip local pool vpn_sce 192.168.100.1 192.168.100.100

Enable ppp authentication and assign pool :

VPN_SERVER(config)# interface Virtual-Template1
VPN_SERVER(config-if)# peer default ip address pool vpn_sce
VPN_SERVER(config-if)# ppp authentication pap chap

4. Enable pppoe in interface :

VPN_SERVER(config)# interface FastEthernet0/0
VPN_SERVER(config-if)# ip address 172.16.0.11 255.255.128.0 secondary
VPN_SERVER(config-if)# pppoe enable

5. Create pppoe client and Dial from windows XP :


6. Verif
y the pppoe session :

VPN_SERVER#sh user
Line User Host(s) Id
le Location
* 66 vt
y 0 fadly idle 00:00:00 172.16.0.134

Interface User Mode Idle Peer Address
Vi1.1 fadly PPPoE 00:00:00 192.168.100.5

VPN_SERVER#


VPN_SERVER#sh vpdn

PPPoE Tunnel and Session Information Total tunnels 1 sessions 1

PPPoE Session Information
UID SID RemMAC OIntf Intf Session
LocMAC VASt state
278 841 0090.f55d.6dbc Fa0/0 Vi1.1 CNCT_PTA
000d.bd6c.3fc0 UP


VPN_SERVER#

VPN_SERVER#sh sss session
Current SSS Information: Total sessions 1

Uniq ID Type State Service Identifier Last Chg
278 PPPoE/PPP connected Local Term fadly 00:04:18


it is very straight forward :)


Tuesday, July 28, 2009

Basic PIX firewall configuration

This is the basic pix firewall configuration and concept

Firewall is networking device that can protect unauthorized internet
users from accessing private network. it has the concept of inside / private network and outside / internet by assigning security level. The outside has a security level of 0 and inside has a security level of 100. Meaning that traffic from lower security level interface will not pass higher security level interface. We can modifiy the rule to make the traffic flow from outside interface to inside interface.


Diagram :


Basic Configuration

1. Set the hostname :

pixfirewall# configure terminal
pixfirewall(config)#hostname pix-jtpd


2. Set the password :

Login password :
pix-jtpd(config)# password cisco

Enable password :
pix-jtpd(config)# enable password cisco

3. Verifiying security level :

pix-jtpd# show nameif
Interface Name Security
Ethernet0 outside 0
Ethernet1 inside 100
pix-jtpd#

4. Set ip address :

interface Ethernet0
nameif outside
security-level 0
ip address 192.168.78.182 255.255.255.252
!
interface Ethernet1
nameif inside
security-level 100
ip address 192.168.78.186 255.255.255.252

Verify interface ip address :

pix-jtpd# sh interface ip brief
Interface IP-Address OK? Method Status Protocol
Ethernet0 192.168.78.182 YES manual up up
Ethernet1 192.168.78.186 YES manual up up
pix-jtpd#

Ping back to back ip address :

pix-jtpd# ping 192.168.78.181
Type escape sequence to abort.
Sending 5, 100-byte ICMP Echos to 192.168.78.181, timeout is 2 seconds:
!!!!!
Success rate is 100 percent (5/5), round-trip min/avg/max = 1/2/10 ms
pix-jtpd# ping 192.168.78.185
Type escape sequence to abort.
Sending 5, 100-byte ICMP Echos to 192.168.78.185, timeout is 2 seconds:
!!!!!
Success rate is 100 percent (5/5), round-trip min/avg/max = 1/1/1 ms
pix-jtpd#

5. Configure default route

pix-jtpd(config)# route outside 0.0.0.0 0.0.0.0 192.168.78.181 1

pix-jtpd# show ip route
C 192.168.78.180 255.255.255.252 is directly connected, outside
C 192.168.78.184 255.255.255.252 is directly connected, inside
S* 0.0.0.0 0.0.0.0 [1/0] via 192.168.78.181, outside
pix-jtpd#

6. Configuring NAT and define subscriber network :

a. Set ip address to name :
pix-jtpd(config)# name 192.168.32.0 subscriber

b. Set subscriber route :
route inside chat-subs 255.255.255.0 192.168.78.185 1

c. Setting nat :
inside network :
pix-jtpd(config)# nat (inside) 1 chat-subs 255.255.255.0
pix-jtpd(config)# nat (inside) 1 192.168.78.184 255.255.255.252

global network :
global (outside) 1 192.168.78.188 netmask 255.255.255.255

NOTE : must configure route from PE to global (outside)

d. Veryfiy nat is working :

pix-jtpd# sh xlate
94 in use, 3299 most used
PAT Global 192.168.78.188(1095) Local 192.168.32.30(2182)
PAT Global 192.168.78.188(1053) Local 192.168.32.30(59266)
PAT Global 192.168.78.188(1052) Local 192.168.32.30(65524)
PAT Global 192.168.78.188(1051) Local 192.168.32.30(50954)

7. Making Rule / Access-list

Setting ACL :

pix-jtpd(config)# access-list acl_grp extended permit icmp any any
pix-jtpd(config)# access-list acl_grp extended permit tcp any any
pix-jtpd(config)# access-list acl_grp extended permit ip any any

Apply to the interface :

pix-jtpd(config)# access-group acl_grp in interface outside
pix-jtpd(config)# access-group acl_grp in interface inside

Have a good try :D

Dhcp Fixed Address

Some hosts will required fixed ip address, such as : web server, printer etc. Host which require fixed ip address need to be mapped with its mac-address. This is sample configuration of dhcp server :

root@fadly-desktop:~# vi /etc/dhcp3/dhcpd.conf

host fadly {
hardware ethernet 00:90:F5:5D:6D:BC;
fixed-address 192.168.78.206;
}

subnet 192.168.78.204 netmask 255.255.255.252 {
option broadcast-address 192.168.78.207;
option routers 192.168.78.205;
option subnet-mask 255.255.255.252;
}

option domain-name 202.155.0.10;